Getting Authorisation from CASA

I’ve been in touch with CASA regarding authorisation of the Balloon flight. What I do know is:-

* I need to ensure that the craft, procedures, etc follow procedures outline in the appropriate legislation

* It can take several weeks for authorisation to be provided

* CASA charge for the process. An estimate is provided, the estimated fee is paid and then work is done. For one application it too 3 hours at a rate of $160/hr. This is probably more then the cost of the payload.

CASA were helpful on the phone but came to the realisation that I obviously need to commit a large amount of time to this component, but suspect it will be time well spent.

I downloaded the Legislation (Volume 3 of 4):-

Civil Aviation Safety Regulations 1998
Statutory Rules No. 237, 1998 as amended
made under the
Civil Aviation Act 1988

Civil Aviation Safety Regulations 1998 Statutory Rules No. 237, 1998 as amended made under the Civil Aviation Act 1988

which was file F2013C00316VOL03.pdf and I am interested in sections 101.140 and onwards.

Interpreting the Legislation

Several things to note about the legislation and how this matches with the project.

  • The balloon that I am making is classed as a ‘Medium’ sized balloon.This is because it is less then 6kg weight but the diameter of the balloon will exceed 2 metres. (It will probably get to about 7 metres just before it pops).
  • The balloon is not a zero-pressure balloon and so requires two ways to bring down the payload and two ways to finish the flight. The balloon ‘popping’ on its own is considered to be one way to satisfy both requirements simultaneously. Another way needs to be added to allow bringing the balloon down – preferably manually.

Testing the antennas

Summary

I need to test the antennas to make sure they will function as reasonable as can be expected. I’m secretly hoping that it can comfortably transmit/receive at a distance of at-least 10 km. This is probably realistic, remembering that the range of these XBee transmitters is about 20 km (as per specs).

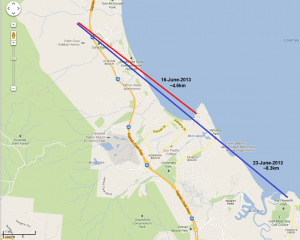
A picture of the test range is below.

Map showing antenna test distances

Details of the testing is below.

Testing on 16-June-2013

I set up the payload on a stool up the road from where I lived and mum watched over it. It was aligned so that from Taylor point it would be roughly 45 degrees. i.e. minimal loss. Taylor point is 4.5 km away. I was able to get lots of data from the payload while sitting on the beach. I also got 1/4 of an image before it froze. I then waited a few minutes for the payload transmission to give-up…which it did. Then I was able to receive data. I then put the earth station into test mode…it requested test mode and the payload accepted and responded accordingly. This is good. This means that at 4.5 km the communication both ways seems to work relatively well. The next test is from Yorkey’s knob ~8km away.

Testing on 23-June-2013

I set up the payload on a stool up the road from where I lived again…this time left it all by itself. I drove to Yorkeys Yacht club and was able to get some packets from a few rocks, just up from the sand. I wasn’t able to get a picture transfer starting very well.

I then drive around the corner to the top and found a perfect area to test! It was a patch of grass with uninterrupted view back to the hill where the payload was. I was able to get through about one quarter of a line of dots (4 1/2 lines of dots = whole file). So…not able to get an image unfortunately, but a lot better.

When I got home, I found that about 24 minutes after I had set up the payload on the stall, the wind had blown it down. Fortunately the antenna was not damaged. Amazingly I was still able to receive the signal. This suggests a fairly resilient system.

I still need to make file transfers a bit more robust. currently it just stalls…no more dots. I had an idea just was I was leaving that I should enable debugging in the xmodem library. I think I’ll also examining the xmodem code to try and guess where things are playing up and see if there is some retry/timeouts that can be adjusted. Even though I have my sights on RFS900 modem, I think xmodem enhancements are a good thing to look at.

Attaching CloverLeaf Antenna to the Payload

Discussion

Much thought was put into how to connect the Cloverleaf antenna to the payload….attachment of the antenna is more of an after thought unfortunately. I’m thinking I probably should have somehow ensured this could have been put inside the box.

Anyhow…needed to engineer a suitable method of connecting the antenna to the payload.

Requirements

I knew that I needed to be careful not to include metallic objects with the install of the antenna. I was wanted to keep the attachment light, but still secure. The cloverleaf is a fairly ‘fragile’ antenna. Any bending of the conductors will result in reduced performance. I always wanted the antenna to point down. The antenna can flop around a bit…remember the whole payload will move around a bit from winds.

The Solution

Eventually it was decided to create some fibreglass structure and attach it to the payload jacket using Velcro.

Construction

Steps are below:-

  • I used blue A4 card to construct a former. This was folded and trimmed to suit.
  • I then used kids glue to glue the fibre-glass mesh to the blue paper.
  • Then I trimmed off excess  fibre-glass mesh.
  • Then I applied the fibre-glass resin/hardener mix.
  • The next day, I marked on the jacket where I wanted the structure to hand from. I then  sewed the Velcro on to the jacket. I was able to stick the complimentary Velcro on to the fibre-glass. This seems to be sticking ok.

Below are some pictures taken during construction and afterwards.

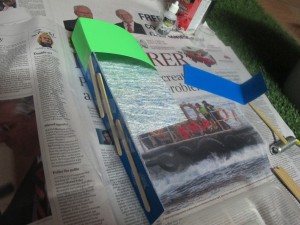
About to apply resin/hardener to fibreglass mesh - part of antenna holder.

Notice the paddle sticks above? There were sticky tapped on the back as a temporary measure to give the wall some integrity.

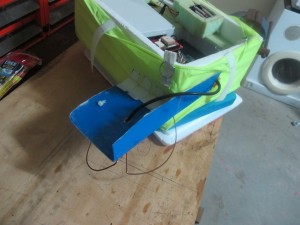
Fibreglass with antenna attached to payload. See RG-223/U cable going to payload. Note Velcro.
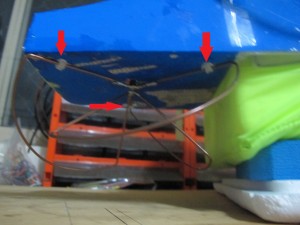
Fibreglass structure holding the antenna. Red arrows point to cable-ties holding antenna

Yes, it doesn’t look pretty, but it should work!