Pushing the boundaries – Next Flight Objectives

The only way to succeed is to not shy away from setting major goals. In particular, the next launch is going to build significantly on the previous launch. The goals of the next launch are to:-

  • Miniturise the PCB significantly
  • Use smaller ‘solder-on’ LIPO Batteries
  • Design PCBs, so they can be daisy chained. This is so that when we get our ‘five’ PCBs from the PCB manufacturer, we don’t use one and waste four. We would be using 2, or possibly 3 of the PCB in the next flight
  • Make the PCB more configurable/flexible in how they can be used.
  • Resolve issue with Air Pressure sensor
  • Utilise greater memory storage with i2c fRAM
  • Use a Accelerometer/Gyroscope (instead of just a gyroscope)
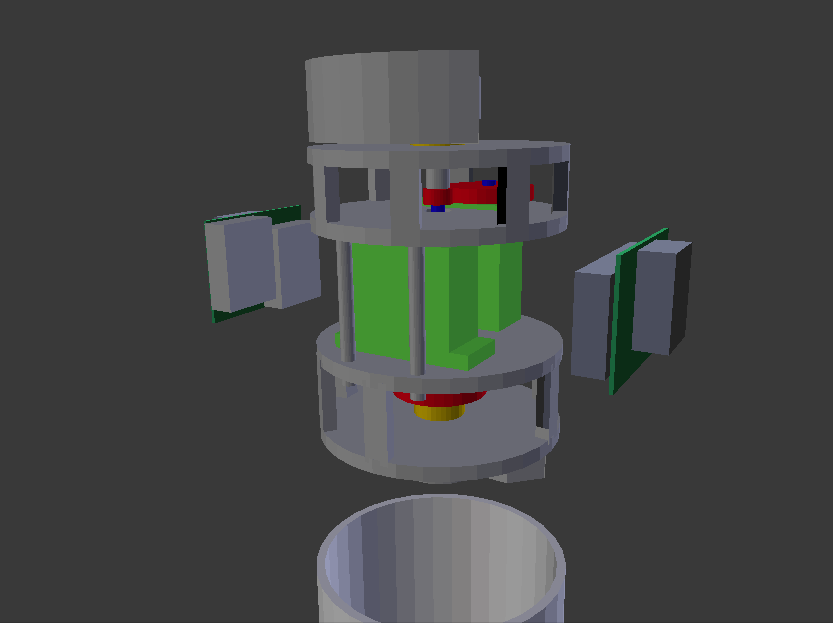
  • Utilise a system to swivel masses around using servos at 0.25 seconds into flight (after some of the motion has dampened down). We want to do this to measure the effect on the flight of the rocket…and so compare to previous results.

This is certainly a huge leap, but not unobtainable. There are many independent parts…some might succeed, while others might fail. So there is sure to be some success, somewhere.

We would need to use a 3-D Printer to turn this into reality.

We are initially going to do a mock-up using Perspex and some electronics in a breadboard. We will initially concentrate on the Servos and their ability to move quickly and consistently.  If this works okay, then we will go about :-

  • Designing a special case PCB
  • Purchasing a 3-D Printer to create the mechanical device

Below is a screenshot of the design inside Blender.


Servo controlled system with electronics boards pulled to left/right. Servos are green, gears are red.

Launch 4 Gyroscope results

Below is a graph of the gyroscope results for nearly 8 seconds of flight.

Rotation of rocket during flight (up until Apogee)

We can make a few statements about this plot.

  • The rotation was anti-clockwise along y-axis (up) when looking up.
  • The rotation sped up until about 1.5 seconds (until the motor stopped running)
  • The whole rocket started to lean over in its flight at about 6 seconds, which is the approximate time required to get to Apogee. (We had our ejection charge to ignite at 6 seconds).

I have a feeling that ejection probably occured later then what I wanted, even though it was supposed to happen at ~6 seconds. I say this because I would have expected a bit of a spike in data as the rocket gets ‘kicked’ around a bit during ejection.

This is suspicion is supported by the video taken by the on-board video. There is a sudden loud sound and jolt from the camera at ~9 to 10 seconds after launch. This would be approximately 1.5 to 2 seconds after the data points above.

So this is very interesting and helpful for future work!

Air Pressure sensor problems

I quickly performed some ‘shake’ tests of the payload on the desk. I managed to get a test run which generated NO Air pressure and temperature measurements!. Then next time I turned it on, it froze up when trying to detect the air pressure sensor. Not good!

So I decided to pull the system apart and check out clearances between the air pressure sensor and surrounding electronics. The components are very close indeed. I proceeded to put some sticky-tape on both sides of the sensor to reduce chance of touching electronics on either side.

I have performed the shake test (quite violently) twice now without any issues, so I’d say that the close proximity and the vibrations in the rocket caused a momentary short. I was lucky that the Gyroscope measurements still worked

Fixes I’ll be looking at putting in are:-

  • Minimum gap between components – 2mm
  • Components supported opposite header pins for breakout boards.
  • Programming of circuit to timeout if it has issues connecting/talking to a component.


In any case, we’ll be completely redesigning the PCBs. So these problems will be resolved then.

Launch Number 4

We finally launched the Model Rocket “JAJI Aerospace” again. It nearly didn’t happen!

We hope you find this interesting and inspiring.

Launch Issues

The Electronics performed perfectly, but the igniters and the pyrogen on the tips refused to ignite the motors. So eventually I needed to use a Copperhead Igniter from my spare G76-10 Motor Kit to get the rocket launched.

Data

The Air Pressure/temperature measurements didn’t work. No idea why this didn’t work. Tests in the office and running up the hill worked. Very strange.

Gyro data was produced and is downloadable (unprocessed) from:-

Raw Gyrodata

When processed, we generated a file:-

Gyrodata – processed

I then process this file data.csv with a Java 3D app to generate an accurate real-time depiction of the Rockets rotation during flight. The data only goes for 8 seconds…right to the point of Apogee.

Feel free to download and use this data.

On-board Camera

We had an on-board camera taking footage. I’ve created two YouTube videos. One is the original footage (un-edited). The second is one slowed down by a factor of 8. At approx 3min and 10 second mark, you will see white spots on the ground. These are people (us) watching the launch. If you look carefully you will also notice the rocket dangling down and the rocket exhaust trail.


Ground based Camera

We had a Canon G12 camera rolling away on a Tripod about 20 metres away. I’ve uploaded a Youtube video showing this launch.


Future Improvements

There is a lot we can do to improve the launch. These points we will be focusing on are:-

  • Work out a more suitably sized parachute (While the recovery all went well, I think with the extra payload weight, a slightly bigger parachute would have been better).
  • I need to practice the installation of Copperheads a bit… I think.
    And I need to figure out why the air pressure/temperature sensor didn’t work.
  • Work out a better camera system…and one that takes movies looking down…with a wide angle lense.
  • Figure out what type of igniter I can use (with reasonable chances of success) with the remaining G76-10 Motor.
  • Experiment and determine why the air pressure sensor did not measure any values.


Final Preparations for Launch 4

Final preparations are being made for Launch 4 which we hope will take place tomorrow, weather permitting.

The Weather

The wind speed is going to be approximately 10 to 15 knots. We don’t really want to fly if more then 15 knots. Rain is 50% chance which sounds bad, but this is over a large area, so it probably a lot less chance then 50%. We will check the radar before we leave to see what is about. We’ll also check the motion of the trees on the mountain next to where we live as they will provide us a good indication of wind speed.

The motor

I have assembled the G76-10 motor. This included reducing the delay from 10 seconds to 6 seconds using the AeroTech tool. One thing I have not done is install the igniter. I want to do that on the day just before launch. The igniter is delicate and I think it is bad practice to install igniters until one is ready to launch.

Here are some pictures of the assembly.

All the parts of G76-10 laid out
Aft Cap with delay charge with 4 seconds removed.
Two grains assembled together
Grains inside AeroTech Case with insulator at top
Nozzle of motor before brass cap screwed on.

Batteries

All batteries have been charged, even if I thought they were okay. I found that the igniter battery was completely flat! Very glad I checked this. This could be because the voltage measuring resistors have flattened the battery. I will leave this disconnected from now on, unless I’m going to sue it.

Test Ignition

I put a high value resistance resistor as the igniter and I was able to perform ARM, CONTINUITY TEST and a trial ignition. I measured a voltage of 12.5 volts across it. Great!

All the Parts

I’ve gone over the checklist and packed everything away.  Ready to go. Also packed the rocket in its delivery box with lots of padding. I decided to roll up newspaper and put in aft and rear of motor to stop rubbish getting in. Before doing this I folded up the parachute and inserted it in as carefully possible. We will need to tie the cord to the bottom of the electronics bay payload before launch.

Everything packed away and ready for launch day.

Last minute Check

I confirmed the steps for the payload turn on. I’ve also got some Masking Take (from my very generous and helpful friend – Alex). This will be used to ensure no shorting of jumpers


Our Model Rocket launches At QRS in January

This post is a little late, but still worth getting out.

On the 10th of January 2016, myself, Anna, Jeremy, Isaac and “Grandpa Val” travelled to the Goldcoast to attend a Queensland Rocketry Society Launch day. We all got to fly a rocket! Even Anna did!

Isaac’s Rocket

Isaac flew a Small 15 Gram model rocket with a B-Engine. He was initially very scared of the noise and wanted to sit further back with the cars. Eventually he got the courage to participate in the rocket launching. Very pound of you Isaac!

Here are some pictures of Isaacs rocket and the boy himself!

Isaac hecking the continuity of his rocket launch line


Isaac's rocket is one with blue nose cone
Isaac’s rocket is one with blue nose cone
Isaac with his Grandpa
Three rocketeers!
Three rocketeers!


Jeremy’s Rocket

Jeremy’s rocket is an exceptional rocket for a first timer. This rocket had a D-engine expertly installed by Blake (Owner of Ausrocketry). It deployed its parachute perfectly! Lovely work Jeremy!

Jeremy with his rocket on launch pad
Jeremy recovers his rocket - all intact!
Jeremy recovers his rocket – all intact!
Jeremy filling out his launch card

Anna’s (Mummy) Rocket (UFO)

Anna couldn’t miss out on the action and launched a UFO rocket. This had a C-Engine in it. It flew really well!

Anna carefully setting up her 'Rocket' for launch.
Anna carefully setting up her ‘Rocket’ for launch.


Joe’s L1 Attempt

Well I decided to go for my L1. This was very exciting. It took a lot of time to set-up the engine, even though it was just a CTI engine! I was taking things very carefully. Didn’t want to make any mistakes.

Inspecting the business end.
Jeremy standing next to my rocket where it landed
Found my rocket. All perfectly intact and only about 100 metres from launch pad.
Setting up the Ignitor
Ready for launch photo shoot.
Successful parachute deployment

What a great day!